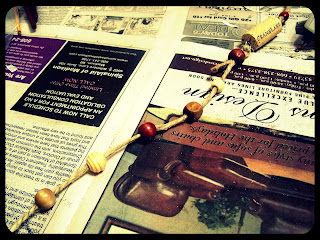
I don't know how many of you are wine drinkers, but in this house we drink plenty of it. I always save the corks so I can do something nifty with them. Well, today I filled up my jar of corks and decided it was time to empty it to make room for more. I just couldn't figure out what to do with them until I looked at my naked Christmas tree. So here is my simple tutorial on how to make my wine cork garland.
Here's what you'll need:
Hemp or twine (and a kitty to chew on it while you try to take a picture of your supplies, thanks Luna)
Some beads, or trinkets, or charms
Eye screws (enough to screw one on each end of the cork)
Scissors
Hot glue gun or the ability to tie knots
Wine corks (as many as you want. I used 16 wine corks, but if I had more I would of strung them closer together)
First, grab a cork and 2 eye screws. You'll screw one eye screw into each end.
Just like this... ta-da! Now take your hemp and go to your Christmas tree (or measure out a good length of hemp) and kinda wrap it around the tree to see how much you'll need. Since I was using 16 corks I cut my piece into 16 pieces and then cut out 2 extra strands to use on the ends.
Now take one piece of hemp and tie it to one end of the cork. Now string on some beads. You can really fill up the whole piece of hemp with beads if you want, but I wanted my garland to still have some hemp showing. So I put 8 beads on each piece of hemp. Now, if you don't own a hot glue gun or don't feel like digging yours out, you can tie a knot on each side of the bead to keep it in place.
I'm using the hot glue gun because I didn't think about tying knots into until after I cut all my hemp. Oh well! Now keep on going until you end up with a strand like this! If you were tying knots as you went, you should be done and ready to place onto your tree. If you are taking the hot glue gun route, then read on...
Lay out a section of the strand and space the beads how you'd like them to look. Notice how I put a bead over the tied end? I suggest this to help hide the loose ends & to keep them from becoming untied (they will be cut off later).
Now there are 2 different ways to glue your beads into place. If you are using beads with smaller holes, you'll need to apply the glue to the hemp first and carefully slide the bead on top of it.
Or maybe you'll own a hot glue gun with a small tip and buy beads with big holes (like I did) and then you can keep your bead in the spot and just shove your hot glue gun into the bead hole like this! It works well and doesn't leave such a stringy mess.
Once your beads are in place you can snip off the ends of knot. Then keep going until your strand is complete!
I think it turned out pretty sweet. Soon to come will be a tutorial on some ornaments & a tree topper, then I just need to get some different colored lights. :) Yay Christmas!


No comments:
Post a Comment